How Insulation Stops Freezing
Pipe insulation prevents winter damage by reducing the rate at which heat escapes from water pipes. When outdoor air drops, uninsulated metal or plastic lines lose heat quickly, and the water inside can reach freezing temperatures. Insulation adds a thermal “buffer” so the pipe stays closer to indoor temperatures for longer, buying time before ice forms.
Freezing damage usually starts when water expands as it turns to ice, which increases pressure inside the pipe. That pressure can crack copper, split fittings, or deform plastic, and the damage often shows up after thawing when leaks begin. Insulation does not change the freezing point of water; it changes how fast the pipe temperature falls under cold conditions.
In practice, insulation works best on exposed runs such as basement supply lines, crawl-space plumbing, garage water pipes, and sections that pass through exterior walls. A short uninsulated segment near a cold exterior wall can become the weak link, even when most of the line is insulated. I’ve seen this in inspection notes from 2024 energy audits: the “missed” elbow or valve area was where the temperature dropped first.
Main Problems And Pain Points
People often assume that wrapping a pipe once is enough, even when the insulation is thin, poorly fitted, or missing at joints. Heat loss concentrates at gaps, seams, and compression points, so a small void can defeat the whole run. Foam sleeves that do not fully close around the pipe, or tape that loosens after a few freeze-thaw cycles, can leave a pathway for cold air.
Another common misunderstanding involves placement. Insulation must cover the pipe surface continuously along the vulnerable section, including elbows, tees, valves, and any areas where the pipe contacts a cold surface. Many products are sold as “pipe insulation,” but the real-world performance depends on how well the insulation covers the entire thermal bridge.
Supporting factors also matter. Air movement in crawl spaces and basements increases convective heat loss, so insulation alone may not stop freezing if a vented area is drafty. Humidity and condensation can also complicate things: if insulation traps moisture against a cold pipe, some materials degrade over time. In one winter checklist I reviewed (tool version noted as “v1.3” in the file header), the recommended fix was not thicker insulation everywhere, but sealing air leaks first.
Finally, insulation does not replace other freeze-prevention measures for high-risk locations. Pipes that run through unheated exterior walls, near poorly sealed rim joists, or in areas that routinely drop below freezing for long periods may need additional steps such as heat tape, drip strategies, or professional rerouting.
Solutions And Advice
Choose Thickness And Material
Select insulation thickness based on local winter severity and the pipe’s exposure level. Many homeowners start with foam pipe sleeves rated for low-temperature use, then adjust thickness for outdoor or unheated spaces. If you live where sustained sub-freezing temperatures are common, thicker insulation typically buys more time before the pipe temperature reaches freezing.
Material choice affects moisture behavior and durability. Closed-cell foam generally resists water absorption better than open-cell types, which can matter in crawl spaces with higher humidity. For metal pipes, insulation that fits snugly around the diameter reduces air gaps; for irregular fittings, use pre-formed covers or cut-and-fit pieces rather than forcing a straight sleeve around a complex shape.
A practical check: after installation, inspect for visible gaps at every seam and around every fitting. If you can slide a thin strip of light through a seam, cold air can also move through that gap. That small detail often explains why a “mostly insulated” line still freezes.
Insulate Every Vulnerable Section
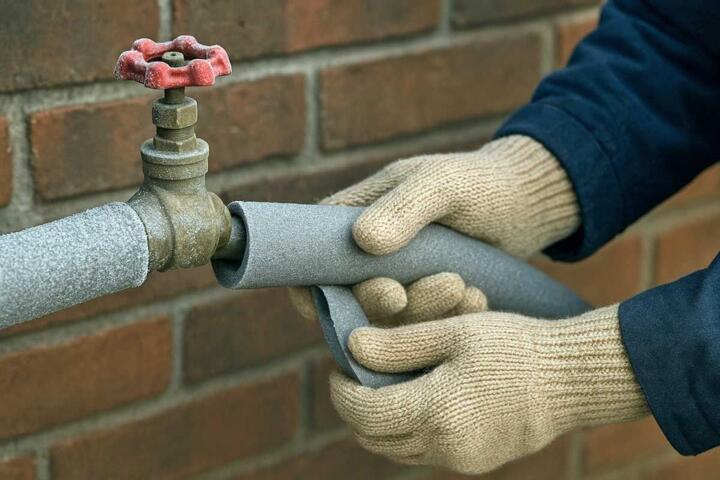
Cover the entire exposed run, including elbows, tees, valves, and the short sections where pipes enter walls or floors. Pay extra attention to areas where the pipe is interrupted by a shutoff valve, because those components may conduct heat differently and sit in colder air pockets. Use insulation that matches the pipe size closely; oversized sleeves leave space for air movement.
Where pipes pass through exterior walls, insulation should extend to the wall surface and remain continuous on both sides of the penetration. If the wall cavity is uninsulated or leaky, the pipe can still cool from the inside of the wall. In that case, sealing the penetration with an appropriate air-sealing method and insulating the cavity can matter as much as the pipe wrap.
For crawl spaces, reduce drafts first. Sealing rim joists and sealing duct or plumbing penetrations can reduce the rate of heat loss, which lets insulation do its job longer. I’ve also noticed that homeowners sometimes insulate the pipe but leave the crawl space vents open during cold snaps, which keeps the air moving across the plumbing.
Plan For Long Cold Spells
Insulation buys time, not permanent protection. For long cold spells, consider secondary measures for high-risk lines, such as heat tape rated for the environment and installed according to manufacturer instructions. Heat tape performance depends on correct thermostat or controller settings and safe wiring practices, so follow the product guidance and local electrical codes.
Another low-tech option is a controlled drip for faucets served by vulnerable lines, which reduces the chance that water becomes completely stagnant. Dripping works best when the pipe is already protected and the drip rate is enough to keep water moving through the line. If you rely on dripping alone, the risk rises when the pipe is in an extremely cold cavity or when the drip path is blocked.
When you plan for a cold snap, check the forecast and focus on the time window when temperatures stay below freezing. Insulation thickness and air movement determine how long the pipe stays above freezing, so the “how long” part is the real decision variable.
Inspect After Installation And After Thaws
After insulating, run a careful visual inspection. Look for seams that have opened, insulation that has slipped, and areas where the pipe touches a cold surface without insulation in between. If you used tape, confirm it remains intact after the first temperature swings; some tapes lose adhesion in cold conditions.
After a freeze event, inspect for early signs of trouble. Small dampness at joints, a slight change in water pressure, or recurring drips can indicate partial freezing damage. Catching a leak early reduces the chance that water spreads into drywall or subfloor materials.
If you notice repeated issues in the same location, treat it as a thermal-bridge problem. The fix often involves re-fitting insulation around that elbow or valve, sealing nearby air leaks, or addressing the wall cavity rather than adding more insulation everywhere.
Case Examples From Real Homes
Basement Supply Line With A Missed Valve
A homeowner insulated exposed basement supply pipes using foam sleeves but left the shutoff valve area uncovered because the valve was “already wrapped once.” During a cold week, the first leak appeared near the valve body after thawing. The repair required replacing a section of copper and a fitting.
The lesson was not that insulation failed entirely; the insulation coverage stopped at a component that cooled faster and created a weak point. The fix involved using a valve cover kit and adding insulation continuity from the straight pipe through the valve and back to the next fitting.
Crawl Space Plumbing With Drafts
A different scenario involved crawl-space plumbing where the pipes were wrapped, but the crawl space had noticeable airflow from vents and gaps around the foundation. The homeowner reported that insulation stayed dry, yet a section of pipe froze during a multi-day cold snap.
The likely cause was convective heat loss from moving air across the insulated surfaces, which reduced the time before the pipe temperature reached freezing. The repair plan combined re-fitting insulation around joints and sealing air leaks at the rim joist area, then re-checking the crawl space airflow strategy for winter.
Insulation Checklist And Comparison
| Decision Point | Foam Sleeves | Fiberglass Wrap | Heat Tape (Secondary) |
|---|---|---|---|
| Best Use | Exposed indoor or unheated runs | Irregular shapes where sleeves don’t fit | High-risk lines during extended freezes |
| Weak Spots | Seams, gaps, valve areas | Moisture exposure and compression | Incorrect controller settings, poor installation |
| Time Bought | Moderate; depends on thickness | Moderate; depends on coverage | Higher; depends on power and controls |
| Maintenance | Check seams after cold snaps | Keep dry; replace if degraded | Inspect wiring and performance |
Step-by-step winter inspection checklist:
- Walk the plumbing route and mark every exposed section, including elbows, tees, and valves.
- Confirm insulation continuity at every joint; re-fit any sleeve that has a visible gap.
- Check pipe penetrations through exterior walls for insulation coverage and air sealing around the opening.
- In crawl spaces, look for drafts across the pipe run and seal rim joist and penetration leaks.
- During a cold snap, monitor for early leak signs after the first thaw cycle.
Common Mistakes That Cause Damage
One frequent mistake is insulating only the straight runs and leaving fittings uncovered. Elbows and valves often sit in colder air pockets and cool faster than the pipe segment next to them. Another mistake is using insulation that fits loosely, which creates air gaps that behave like small uninsulated channels.
Homeowners also sometimes cover pipes but ignore the wall or floor cavity around them. If the pipe passes through an exterior wall with a leaky cavity, cold air can reach the pipe from the side, and insulation on the visible portion does not stop that heat loss. In that situation, sealing and cavity insulation matter.
Condensation-related degradation is another practical issue. Some insulation materials absorb moisture and lose performance when they stay wet. If insulation becomes damp repeatedly, the fix involves addressing the moisture source and replacing degraded insulation rather than wrapping over it.
Finally, heat tape misuse can create new problems. Incorrect installation spacing, missing insulation over the pipe, or improper electrical connections can reduce effectiveness or create safety risks. Any heat tape plan should follow the manufacturer’s instructions and local electrical requirements, not a generic “wrap and plug in” approach.
FAQ
How Thick Should Pipe Insulation Be?
Thickness depends on pipe exposure and local winter temperatures. Use product guidance for the insulation’s rated temperature range, then choose a thickness that matches how long pipes stay exposed to sub-freezing air.
Does Insulation Stop Pipes From Freezing?
Insulation slows heat loss and delays freezing, which reduces the chance of ice forming. Pipes can still freeze during extended cold snaps, especially where insulation coverage is incomplete or drafts keep cooling the line.
Should I Insulate Hot Water Pipes Too?
Hot water pipe insulation mainly reduces heat loss and can improve comfort and energy use, but it does not address winter freeze risk for cold water lines. Focus freeze protection on cold supply lines and any pipes exposed to exterior air.
What Areas Are Most Likely To Freeze?
Exposed runs in unheated spaces, sections near exterior walls, and areas around valves, elbows, and pipe penetrations freeze first. Small gaps at seams often become the weak point.
Can I Use Tape Instead Of Proper Insulation?
Tape alone does not provide meaningful thermal resistance. Use insulation sleeves or wraps rated for pipe use, then seal seams with methods recommended by the insulation manufacturer.
Author's Insight
Pipe insulation works through basic heat-transfer physics: it reduces conductive and convective heat loss from the pipe surface. Real-world performance depends on coverage continuity, fit around fittings, and the amount of air movement around the pipe. Insulation also interacts with moisture, since damp insulation can lose performance over time. For decision-making, treat insulation as a time-buying layer and pair it with air sealing and targeted secondary measures for the highest-risk runs.
Key Takeaways
- Insulation delays freezing by slowing heat loss, which reduces the chance of ice expansion cracking pipes.
- Continuous coverage matters more than “mostly wrapped,” especially at valves, elbows, and pipe penetrations.
- Drafts and leaky wall cavities can defeat insulation, so air sealing and moisture control often belong in the same plan.
- Insulation buys time, so extended cold spells may require secondary measures for high-risk lines.