Starting the Apiary
Beekeeping is often romanticized as a passive hobby, but in reality, it is a form of micro-livestock management that requires precise environmental calibration. An apiary is a complex biological system where the keeper acts as a facilitator rather than a controller. Understanding the pheromonal communication within a Langstroth hive or the thermal regulation of a Top Bar hive is the first step toward proficiency.
In practice, this means recognizing that a single colony can house up to 60,000 individuals during the summer peak. According to the Bee Informed Partnership (BIP), winter loss rates in the United States often fluctuate between 30% and 45%, frequently due to poor timing in mite treatments or inadequate caloric reserves. Starting with two hives rather than one is a standard expert recommendation, as it allows for resource sharing and comparative diagnostics.
Selecting the Right Hive Architecture
The choice between a 10-frame Langstroth and an 8-frame version is not merely aesthetic; it involves physical ergonomics. A 10-frame deep super filled with honey can weigh over 80 pounds, whereas an 8-frame medium super weighs approximately 40-50 pounds. For hobbyists concerned with back health, the 8-frame system or horizontal hives like the Dartington or Beehaus provide a more accessible entry point without sacrificing colony health.
Protective Gear and Safety Standards
Safety equipment is non-negotiable for the novice. A full ventilated suit, such as those produced by Ultra Breeze or Humble Bee, utilizes multi-layered mesh to provide airflow while keeping the stingers away from the skin. Leather or nitrile gloves are the primary interface with the bees; while experts often go gloveless for better tactile sensitivity, beginners should prioritize confidence-building through full protection during the first 12 months.
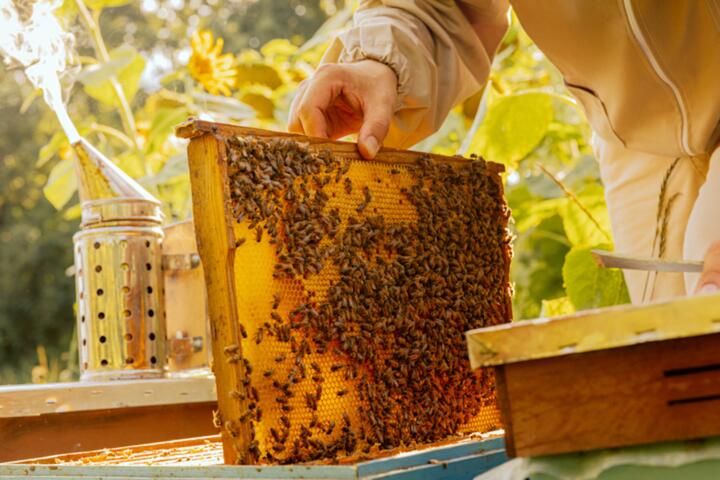
Essential Tools for Hive Manipulation
Beyond the suit, the smoker and the hive tool are the extensions of the beekeeper’s hands. A heavy-duty stainless steel smoker with a protective guard is essential for calming bees via the disruption of alarm pheromones (isopentyl acetate). The J-hook hive tool is preferred by many professionals over the standard flat tool because it provides superior leverage for lifting frames without crushing the delicate wooden ears or the bees resting on them.
Core Challenges
The primary reason for failure in the first two years is "The Dunning-Kruger Effect" applied to entomology. Novices often assume that bees can survive on "autopilot," leading to late-season collapses. Ignoring the Varroa destructor mite is the single most common mistake; these parasites vector Deformed Wing Virus (DWV) and can decimate a colony in weeks if the phoretic load exceeds the 3% threshold (3 mites per 100 bees).
Another pain point is "starvation by neglect" during the early spring or late autumn. If a beekeeper fails to monitor the weight of the hive, the colony may starve even with food nearby if the cluster is too small to move to the stores. This results in "deadman's poses"—bees found head-first in cells—which is a heartbreaking and preventable outcome of poor time management.
Strategic Management
Success requires a shift from reactive to proactive management. This involves a strict schedule of inspections every 7 to 10 days during the swarming season (April through June in the Northern Hemisphere). This cadence allows the keeper to spot queen cells and intervene before the primary swarm departs with 50% of the foraging force and the old queen.
Utilizing digital tools like BeeWise or the Apiary Book app helps track hive health, queen age, and treatment dates. Integrating integrated pest management (IPM) involves using screened bottom boards for passive mite drop and drone brood removal to naturally lower parasite populations. For chemical interventions, rotating between organic acids like Apiguard (thymol) and Oxalic acid vaporization ensures that mites do not develop resistance.
Calculating the Financial Investment
A realistic budget for a two-hive setup ranges from $800 to $1,200. This includes the woodenware (bottom boards, hive bodies, supers, covers), a nucleus colony (nuc) or package bees, protective gear, and basic tools. Opting for "nucs" (5-frame established colonies) rather than "packages" (3 lbs of loose bees with a caged queen) often results in a 40% higher survival rate for beginners because the colony already has a laying queen and established brood.
Seasonal Time Management Breakdown
In spring, plan for 2 hours per week for two hives. This time is spent checking for queen rightness and adding space. In summer, the commitment drops to 1 hour every two weeks, focusing on honey stores and mite sampling. Fall requires 3 hours per week for winterization, feeding 2:1 sugar syrup, and applying final treatments. Winter is largely hands-off, requiring only 15 minutes a month to check for wind damage or blocked entrances.
Mastering the Mite Wash Technique
Reliable data is better than visual inspection. Performing an alcohol wash or a powdered sugar shake is the only way to accurately quantify mite levels. A "sticky board" check is often inaccurate due to environmental variables. By using a specialized wash kit, such as the Varroa EasyCheck, a beekeeper can make informed decisions about whether to treat, saving the colony from a viral "crash" in October.
Management Cases
A suburban hobbyist in Oregon started with two packages of bees but failed to monitor mite counts in August. By September, the mite load was 12%, and both hives collapsed before the first frost. The following year, they switched to local survivor stock nucs and implemented monthly alcohol washes. By treating with Formic Pro when levels hit 2%, they successfully overwintered both colonies and harvested 60 lbs of honey.
A small-scale commercial orchard in Pennsylvania integrated five hives for pollination. Initially, they struggled with swarming, losing three queens in the first month. They hired a consultant to teach "split" techniques—intentionally dividing a strong colony into two. This not only stopped the swarming but increased their hive count to eight by autumn, providing a surplus of bees to sell as nucs the following spring, turning a $2,000 cost into a $1,500 profit.
Equipment Comparison
| Component | Langstroth (Std) | Top Bar (Horiz) |
|---|---|---|
| Initial Cost | Moderate ($150-$200) | Low DIY ($100) |
| Maintenance | High (Heavy Lifting) | Low (No Lifting) |
| Honey Yield | Maximum (50-100 lbs) | Moderate (20-40 lbs) |
| Primary Focus | Production/Comm. | Natural/Low Stress |
New Beekeeper Checklist
- Secure a location with morning sun and afternoon shade.
- Order bees in January or February for April delivery.
- Assemble and paint woodenware (exterior only) 4 weeks before bees arrive.
- Register the apiary with the local Department of Agriculture.
- Join a local beekeeping association for mentorship and localized advice.
Common Pitfalls
One major error is "over-inspection." Opening the hive daily disrupts the internal temperature (95°F) and stresses the queen, potentially leading to her being "balled" (killed) by her own workers. Stick to a 7-10 day cycle. Another mistake is harvesting honey in the first year. In most climates, a colony needs 60-80 lbs of honey to survive the winter; taking this surplus too early is a death sentence for the bees.
Avoid buying used woodenware unless you can verify it hasn't been exposed to American Foulbrood (AFB). AFB spores can remain viable for 80+ years and are highly contagious, requiring the burning of all equipment. Always start with new frames and foundations to ensure a clean biological start for your insects.
FAQ
How much space do I need for a hive?
You can keep bees on a standard residential lot. The "flyway" is more important than the footprint; bees need a clear path to fly up and out. A 6-foot fence or hedge in front of the hive forces them to fly above head height, minimizing interactions with neighbors.
Is beekeeping an expensive hobby?
The first year is the most expensive due to the "startup tax" of gear. After the initial $1,000 investment, annual costs drop to approximately $50-$100 per hive for treatments and minor repairs, provided the bees survive the winter.
Do I need to be a gardener to keep bees?
While helpful, it is not required. Bees forage up to 3 miles from the hive, covering roughly 28 square miles. They will find forage in nearby parks, weeds, and trees that you didn't even know were blooming.
How many times will I get stung?
With proper gear and calm handling techniques, stings are rare. Most hobbyists experience 1-5 stings per season, usually through gloves or during a clumsy moment. Using smoke effectively is the best deterrent.
Can I make a profit from my bees?
In the first 2-3 years, you are unlikely to see a profit. Once you have established colonies, revenue can come from honey sales ($10-$15/lb), beeswax, propolis tinctures, and selling "nucs" to other beginners.
Author’s Insight
In my decade of managing apiaries across varying climates, the most successful keepers aren't those with the most expensive gear, but those with the best observation skills. I always tell my students: "Listen to the roar of the hive." A healthy colony has a focused, rhythmic hum; a queenless hive has a frantic, high-pitched whine. My best advice is to spend 10 minutes every evening just watching the entrance—observation is 90% of beekeeping, and intervention is only 10%.
Summary
Starting a journey in beekeeping requires a balanced commitment of financial resources and disciplined time management. By prioritizing mite management, selecting ergonomic equipment, and adhering to a consistent inspection schedule, you can move past the novice stage and into a rewarding partnership with these essential pollinators. Focus on the health of the colony first, and the honey will eventually follow as a natural byproduct of your expertise. Start small, stay observant, and respect the biological needs of the hive.