Runoff Control
A dry well is essentially an underground structure that disposes of unwanted water, most commonly stormwater runoff, by dissipating it into the ground. Unlike a septic tank which holds liquid, a dry well is designed to be "dry" most of the time, only filling during rain events and then slowly emptying as the water percolates through the soil layers.
In high-density urban environments like Seattle or Portland, where impervious surfaces cover over 60% of the land, traditional gutters often fail during peak intensity events. I have seen projects where a single 500-gallon dry well prevented basement flooding for a 2,500-square-foot home that previously suffered thousands in water damage annually.
According to the EPA, an effectively designed infiltration system can remove up to 90% of suspended solids and 60% of phosphorus from stormwater before it reaches the aquifer. This is not just about drainage; it is about localized water treatment and ecological balance.
Critical Design Failures
The most frequent mistake in subsurface drainage is a lack of pre-filtration. When raw runoff from a roof—carrying asphalt shingle granules, organic debris, and bird droppings—enters a dry well directly, the system will fail. The fines clog the geotextile fabric and the soil interface, turning an expensive asset into a buried "bathtub" that no longer drains.
Failure to perform a percolation test (perc test) is another cardinal sin. If you install a system in heavy clay (Type D soil) without adjusting the footprint, the water will sit stagnant for days. This creates anaerobic conditions, foul odors, and can eventually lead to hydrostatic pressure building up against nearby foundation walls.
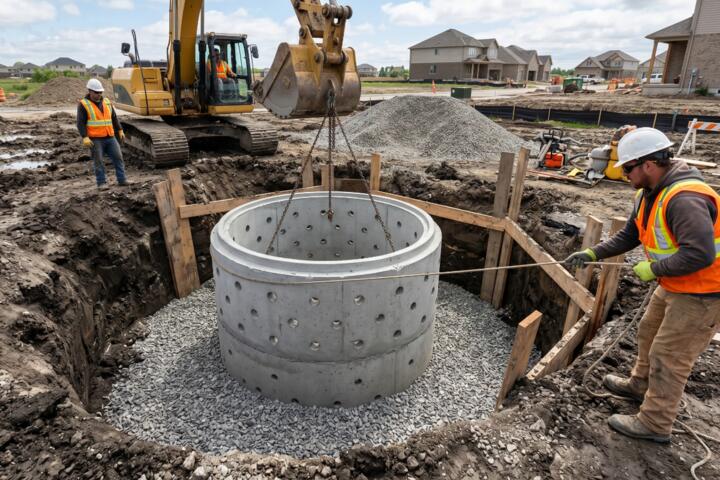
I recently consulted on a commercial site where the dry wells were placed too close to the building. The saturated soil caused the adjacent retaining wall to lean by 3 inches in a single season. Proper setbacks—usually a minimum of 10 to 20 feet from foundations—are non-negotiable for structural integrity.
Advanced Strategies
Mastering the Percolation Test
Before breaking ground, you must determine the Soil Infiltration Rate. Use a standardized Falling Head Test: dig a hole to the depth of your planned well, fill it with water, and measure the drop over 24 hours. A rate of less than 0.5 inches per hour generally requires a larger footprint or a different drainage solution altogether.
Selecting High-Capacity Modules
Modern professionals are moving away from traditional "gravel pits" toward high-density polyethylene (HDPE) chambers like the NDS Flo-Well or CULTEC Recharger. These units provide significantly more void space (up to 95%) compared to the 30-40% provided by an equivalent volume of crushed stone. This allows for a smaller excavation footprint while managing the same volume of water.
Integrated Pre-Filtration Systems
To ensure a 20-year lifespan, you must install a debris trap. Products like the Rain Bird 600 Series or a simple inline catch basin with a silt sock are essential. These "sacrificial" components catch the sediment above ground where it can be easily cleaned out, preventing the subterranean soil from blinding.
The Role of Non-Woven Geotextiles
Wrapping the dry well in a high-quality, non-woven geotextile fabric (such as Mirafi 140N) is vital. This fabric acts as a filter, allowing water to pass through while keeping the surrounding soil from migrating into the stone reservoir. Never use woven "weed barrier" for this purpose, as its flow rate is insufficient for stormwater surges.
Optimizing the Stone Reservoir
Surround your HDPE chambers with 1.5 to 3-inch washed angular stone. Avoid "rounded" river rock as it doesn't interlock as well. The angularity provides better structural stability for the soil above. Ensure there is at least 6 to 12 inches of stone on all sides of the chamber to maximize the surface area for infiltration.
Overflow and Bypass Engineering
Every dry well has a limit. You must engineer a "pop-up emitter" or a high-level overflow pipe that directs excess water to a safe vegetated area once the well reaches capacity. This prevents the system from backing up into the downspouts and causing gutters to overflow onto the siding.
Performance Case Studies
Residential Restoration (Case 1)
A homeowner in New Jersey faced chronic lawn saturation. We replaced a failing 4-foot deep stone pt with two NDS Flo-Well units connected in series. By increasing the effective storage capacity by 250% and adding a dedicated silt trap, the backyard became usable within 4 hours of a 2-inch rainfall event, compared to 48 hours previously.
Commercial Parking Lot (Case 2)
A small retail plaza in Ohio struggled with "puddle ponding" that iced over in winter. We installed an array of four CULTEC 330XL chambers beneath the permeable paver section of the lot. Post-installation data showed a 100% reduction in surface icing and a 40% decrease in peak flow discharge to the city’s storm sewer, saving the owner $1,200 annually in stormwater utility fees.
System Comparison
| System Type | Void Space % | Best Use Case | Installation Difficulty |
|---|---|---|---|
| Traditional Stone Pit | 35% | Budget residential projects | High (Heavy labor) |
| HDPE Modular (Flo-Well) | 90-95% | Limited space, DIY-friendly | Low (Lightweight) |
| Concrete Gallies | 90% | High-load traffic areas | Very High (Requires crane) |
| Large Arch Chambers | 95% | Large commercial lots | Medium (Equipment needed) |
Avoiding Common Pitfalls
The most expensive dry well is the one you have to dig up twice. Avoid the "out of sight, out of mind" mentality. Always install an inspection port—a 4-inch PVC pipe extending from the top of the well to the surface with a threaded cap. This allows you to stick a ruler down and verify that the water is actually receding.
Furthermore, never install a dry well in areas with high groundwater tables. If the bottom of your well is less than 2 feet from the seasonal high water mark, it won't drain; it will simply fill with groundwater from below. In coastal regions or marshlands, you may need a shallow, broad "bioswale" instead of a deep dry well.
FAQ
How long does a dry well typically last?
With a properly installed pre-filter and geotextile wrap, an HDPE dry well can last 20 to 30 years. Without pre-filtration, siltation can render it useless in as little as 3 to 5 years.
Can I connect my sump pump to a dry well?
Yes, but you must ensure the well is sized to handle the pump's GPM (Gallons Per Minute) output. Sump pumps often move water faster than soil can absorb it, so a larger storage reservoir is usually required.
What size dry well do I need for my roof?
A general rule of thumb is 1 gallon of storage per square foot of roof area for a 1.5-inch rain event. However, this varies based on your local "design storm" data provided by NOAA.
Is a permit required for installation?
In most jurisdictions, yes. Stormwater management is heavily regulated. You likely need to show a site plan that respects property line setbacks and utility easements.
Will a dry well attract mosquitoes?
No. Because a properly functioning dry well is underground and drains within 72 hours, it does not provide the standing water necessary for mosquito breeding cycles.
Author’s Insight
In my two decades of site work, I have found that people consistently underestimate the volume of water a single roof produces. For a 2,000-square-foot roof, a one-inch rain produces about 1,250 gallons of water. When I design these systems, I always "overbuild" by 20% to account for the increasing frequency of extreme weather events. My best advice: invest in the highest quality filter fabric you can find; it is the single most important factor in preventing long-term system failure.
Summary
Dry well construction is a precise science that balances soil mechanics with hydraulic volume. To succeed, prioritize accurate percolation testing, utilize high-void HDPE modules, and never skip the pre-filtration stage. By implementing these expert-level standards, you create a resilient drainage system that protects your property value and supports the local environment. Start by calculating your total impervious surface area and consulting local municipal codes to ensure your design meets current runoff mandates.